How To Draw Bubble Letters Easy Guide for Beginners
Draw Bubble letters, we can also say 3D letter form, but according to me, bubble letters mean that the letters look like bubbles or balloons: rounded, bulging, shiny, and colorful; isn’t it?
So Now to you know what how actually bubble letters look like now going forward today I’ll teach you how you can easily draw bubble letters.
let’s Get into……
What are Bubble Letters?
Bubble letters are a type of handmade letters – fancy letters which are created using simple outlines and then get shaded or colored for more fancy and unique effects.
Bubble letters are very easy and we also have fun drawing them.
By sketching a letter with a pencil, from the basic letters, and then drawing an outline around it.
We can give details to our bubble Letters by creating a color gradient, shadows, and patterns. These bubble letters look great on cards, brochures, posters, and even on school projects.
Bubble letters are very appropriate to use for cartoons and humorous titles, posters, logos, graffiti, designs, or celebratory party-style texts because bubble writing is very playful and friendly-looking.
Bubble letters are very popular in graffiti. But, here we will be focusing on how can we create bubble letters on paper.
And the most important thing, which you need to know while starting learning bubble letter writing is that if you know the basics of these letters then you are gonna have fun while doing this otherwise it will look difficult to you.
Now, I’ll tell you what materials are required before learning how to create bubble letters.
before that, you can also download the bubble letter fonts by clicking here.
1. Drawing Papers
Don’t take simple paper or construction paper they will get fuzzy and when you erase in those paper they might get holes in it and even when you will color it, it won’t look bright; rather it will look dull.
Thick papers can be used for drawing and will definitely support your flow of drawing.
These sheets are a little costly but it is affordable.
2. Pencil
Take pencils that get erased easily and make dark lines wherever required.
It’s better if you take ‘Ticonderoga’ brand pencils as they are the most reliable and are easy to erase.
You can use 4B and 5B pencils, it’s soft enough to give a good layer without going blunt fast and best for detailing.
3. Eraser
Take a large and clean eraser which don’t make your workplace shit. Always clean the eraser before using it so that it will not ruin your work and you can proceed easily. Use the eraser gently don’t rub it forcefully.
4. Sharpie Black Marker
These markers make good black lines as they are very fine and pointed. And, the most special thing about this marker is it never gets licked, even after it gets wet it doesn’t make any mess. Sharpie is most recognized as it carries high-quality products and provides bold and sharp lines.
5. Colored Pencils, Markers, or Crayons
You will need different colored pencils, markers, or crayons to give the bumble effect on the letters.
You can use colored pencils to tint a drawing with light strokes or to create a solid deposit of many layers of colors.
The use of colors offers a range of possibilities, especially in their hues.
NOTE – Remember to keep extra papers underneath for the protection of your table.
The Basic Construction of Bubble Letters
Step by Step
1. Draw a Capital Letter for a Lower Case
You can start with whichever letter you feel like starting with. A is a simple capital letter and a good place, to begin with.
Try to keep them all about the same size though it doesn’t have to be perfect.
You need to use the same technique for lowercase letters as well.
NOTE – If it doesn’t get right then don’t worry as it’s just a guiding line that you will be drawing, and which you’ll have to erase later.
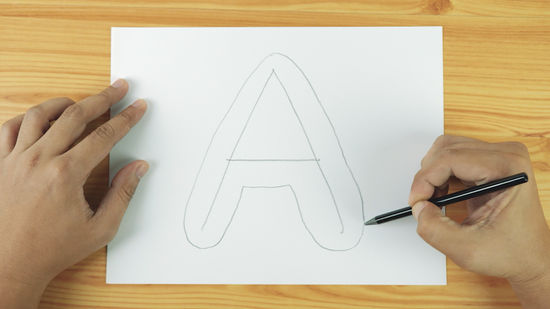
2. Drawing an Outline of Rounded Edges Around the Letter
With the help of a pencil, leaving the same gap between the original letter and your new outline on all sides of the letter trace around the letter.
Just take care to round off the edges and corners so that your bubble letters look soft not like block letters.
You can draw many outlines as you want until you find the thickness you like. Make sure the edges don’t get sharp from any
3. Over each line of your letter, draw ovals with a pencil
You can draw individual ovals for each line of the letter if you think it is hard to outline the whole letter.
For straight lines, you can just draw one oval per line like the sides of the letter A.
For curved lines, you will have to use multiple ovals to cover the whole line like the letter C.
Experiment with various thicknesses of ovals to find out your favorite one. In case the ovals of different letters overlap, you can erase the interior lines for a better feel.
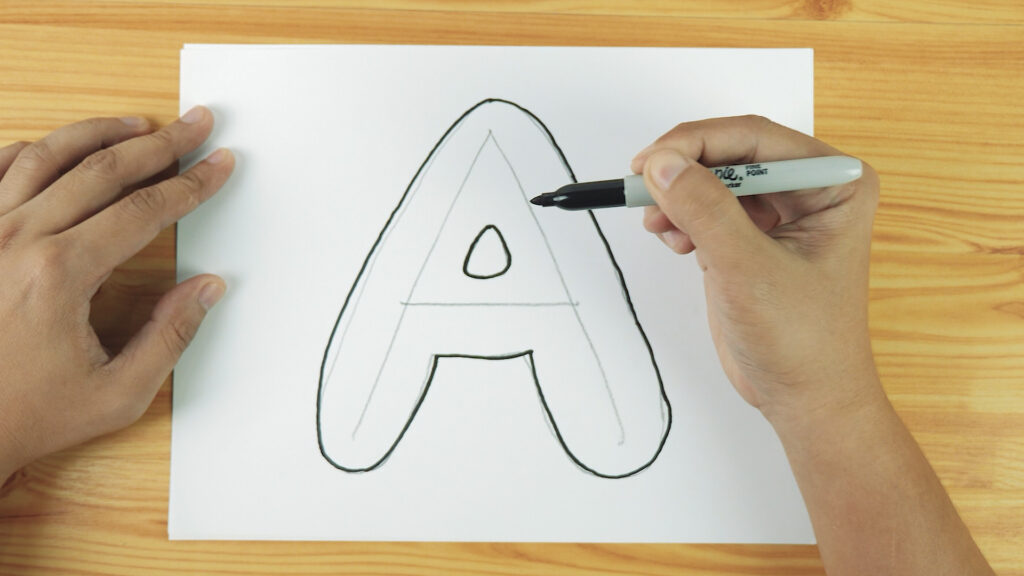
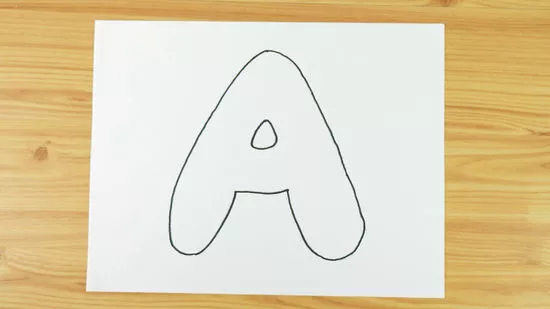
4. Sketch little circles or triangles inside the loops of the letter
For example, for A you only need to use a triangle in the upper middle part of the letter.
and for “B”, You could draw two little circles, one in each hole in the letter. You can either shade the little triangles and circles or just leave them.
5. With the help of a pen or marker outline be outside of the letters
Just make sure that you avoid going over any interior or overlapping lines.
You should not trace over the lines where short lines overlap with long vertical lines.
The pencil marks are given just to guide you in drawing bubble letters; you don’t need to stick to them.
Be creative with the curves and make adjustments as you outline your letters.
6. Erasing the pencil marks
Now, erase all the pencil marks inside, so that there are no visible marks.
Once you complete erasing the construction lines you will be left with beautiful bubble letters.
Clean off the eraser shavings so they don’t come in way of further drawing.
Adding Details to your Bubble Letter
1. Drawing cast shadows on one side of your letters
For the letter’s casting shadow look, add a black edge along one side of your letter with the help of a pen or marker to make it look like shadows…
You need to be consistent about which side of the letter your shadows are on for all the letters.
And the most important thing to remember is that you include shadows on the small holes inside the letters, too.
It will create an illusion of a light source in one particular part of your sheet.
2. With the help of colored pencils or markers fill in your letters with a color gradient
If your light is coming from above you could shade your letters with dark blue on the bottom and a light blue on top.
And even, you can use different colors on the bottom and top.
You can use as many different colors as you want in one letter and can get creative with your colors.
3. As an alternative, color your letters with fun patterns
You can fill in your bubble letters however you want it; it depends upon you.
You can try Zebra print, Polka dots, Stripes, Hearts, stars, spirals, or Zig-Zag.
For a more cohesive look, you can make one pattern across all your letters.
For a more cohesive look, you can make one pattern across all your letters. Use colored pencils, markers, crayons, or whatever you to add to your bubble words.
For Drawing Bubble Letters; a Few More Extra Tips
1. Drawing bubble letters in different styles
Earlier we give you the idea of learning the basic construction of bubble letters. Once you get comfortable with these basic constructions then you can tweak the shapes and you can create your forms.
2. For an extra pop add a second outline
By adding a second outline around the letter and the shadows you can show pop in your bubble letter even more.
You can do this monochrome single color or with different colors.
3. With the spacing of your bubble letters, play around
You can play around while drawing bubble letters, with the spacing of the letter in a word.
Give a small space between the letter and let the letters clash with each other.
If you feel like the letters overlap each other, then just remember to add an outline.
4. Drawing trick
Draw your lines with a light hand so you can erase them without having any problem.
5. Experiment with drawing bubbles
Experiment with drawing your bubble letters close enough to touch each other or standing with space between them, and see which suits you best.
6. Using Smudgeable ink or Gel Pen
If you are using smudgeable ink or gel pen, wet it to dry before you touch or turn the page.
7. Adding points
Try adding points to the tops of different types of letters.
8. practice makes the man perfect
Do practice before you actually go to do the real thing.
9. Bubble Letter-adding more puff
A very simple and easy tip to make your letter look more ‘bubbly’.
And the tip is that add more details to the inner edges so that you can make your letter look bloated.
Video Tutorial
You can also watch this Video Tutorial if are getting any problems with this video by Lettering Daily.
if you are also interested in Calligraphy tutorials just check here
Final Words
That’s all that you need to know for the basic construction of bubble letters.
We just hope that these simple and easy steps helped you in learning, to draw bubble letters easily.
Remember that these were just the basics of bubble lettering and when you get comfortable with these basics, then you can create your style forms.
Bubble letters are comparatively easy and fun to draw as it includes color filling and stuff like that.